How to make Polaroid emulsion lift triptych prints


Update: October 2022
Some exciting news! In October 2020 I bought a 5-pack of Polaroid i-Type Color with a production date of 06/2020 mainly to continue working on my Stone Flowers prints, but I decided to use the last pack of film to have another go at making emulsion lift prints, and it worked beautifully! The problem I noted in in my August 2022 update with the white zinc oxide layer sticking to the emulsion layer seems to have disappeared.
The only real adjustment to my technique was to use much cooler water. Heating the water to 70°C, like been doing successfully for years, now seems to weaken the emulsion layer too much, making big tears (not to mention the kind of tears that come from my eyes LOL) almost inevitable. So now I'm just using water I would describe as comfortably finger warm. This means the emulsion layer needs to general help to separate from the black plastic and zinc oxide later, but it's still possible with a little patience.
I've now bought another 5-pack of film (this time with a production date of 07/2022 and similarly good results) and I am working on a new series of emulsion lift prints of plants printed onto plywood… I'll be posting a gallery soon!
Update: August 2022
I wrote this article back in 2020, but I've had problems making emulsion lift prints more recently. Polaroid have a habit of making continuous 'improvements' to their films, and recent changes have made making emulsion lift prints more difficult, particularly in making the white zinc oxide layer difficult to remove from the emulsion layer. I haven't given up on this technique though: maybe future changes will make emulsion lift printing easier again, or perhaps I can change my technique. I'll update this article in either case! But for now I'm just leaving this article online as a matter of historical record, and if you have more luck with recent Polaroid film made 2022 or after I'd love to hear about it!
What is an emulsion lift?
One of the things I love most about Polaroid photography is the wide range of creative things you can do with a Polaroid print. And perhaps my favourite technique is the Polaroid emulsion lift. The basic concept is simple enough: you take an ‘integral’ (i.e. SX-70, 600, Spectra/Image or I-Type) Polaroid print, trim of the white border and separate the transparent front layer from the black plastic back layer. The photographic emulsion layer that contains the image will be on one of these two layers. If you put that layer into hot water it will lift off in a minute or two and float in the water. You then put a receiving material of some sort (usually plain watercolour paper) unto the floating emulsion layer is lift it out. You can then use brushes to smooth out the emulsion layer and then let it dry out. The emulsion layer will thoroughly adhere to the watercolour paper once it is dry.
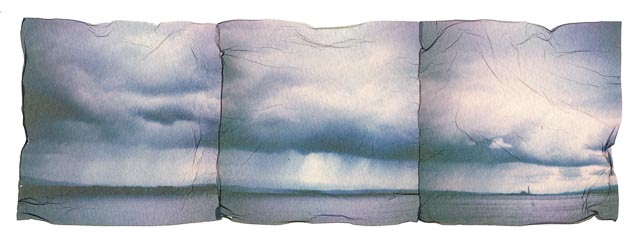
You will be left with a print that has wrinkle and tears from the water that will give it a unique painterly effect.
I made the prints shown here for my Royal Photographic Society Fellowship portfolio.
The process is easier in practice that the above description makes it sound, but the process is expensive (because Polaroid film is expensive!), time consuming, unpredictable and sometimes very frustrating, so why on earth do I do it?!
Why do I make emulsion lift prints?
I love digital photography… it rejuvenated and expanded my photography because for the first time I was able to take complete control of the entire photographic process (I never had the space or money for a darkroom!). In fact my current process for making these prints begins with a digital image. But I sometimes find that after a day working on digital prints, essentially pushing pixels around on a computer screen and then hitting the ‘print’ button to make the inkjet print on the other side of the room whir into life to spit out a print, can leave me feeling rather detached from the whole process.
But this process lets me get back to working with my hands. After making an emulsion lift print I feel like I have created a hand-crafted object that (despite the fact that it started with a digital image) is unique and unrepeatable. And that brings a lot of satisfaction that digital photography sometimes lacks.
Also, Polaroid film is far from perfect, but that means it brings its own character to the final print. It takes me back to the days of selecting materials before you start creating photographs because of the character they will bring to the final result and then letting your materials add their character without worrying too much about the pixel-level technical perfection that digital photography perhaps overly encourages.
Equipment and materials
OK… enough with the philosophical mumbo-jumbo! How do you actually make an emulsion lift print? Let’s start with the tools and materials you’ll need.
 Cutting mat, craft knife and a steel ruler
You going to need some way to perform open-heart surgery on a Polaroid print. Scissors will do, but a craft knife and a steel ruler will give more control.-
 An Impossible Instant Lab and Polaroid i-Type colour film
Of course you’re going to need some way to actually make Polaroid prints! I use an Impossible Instant Lab which creates analogue Polaroid prints from digital images by literally taking a photograph of your mobile phone screen. The Impossible Instant Lab is no longer made but you can find them second hand on eBay (unless you have an iPhone 4s, 5, 5s or SE make sure you get the Universal model rather than the original model!). And Polaroid now make an updated model called the Polaroid Lab Instant Printer which yo can buy brand new for £119.99.I find that with the current generation of Polaroid colour film you need to prepare your print within 30-60 minutes of making it. This makes using a real Polaroid camera to take Polaroid photographs logistically very difficult unless you're creating still-life type photos at home. You can use either b&w or colour film, but b&w film behaves differently to colour film (and I haven't had much luck with the most recent generation of Polaroid b&w film) so I’m going to concentrate on colour film for this article. You can use any Polaroid film (SX-70, 600, i-Type) but i-Type is the most economical to use with an Instant Lab.
 Some kind of receiving material to make your prints on.
The material I normally use is plain watercolour paper. Watercolour paper comes in two basic types: cold pressed paper for a textured finish, and hot pressed paper for a smooth finish. This is down to personal taste, but I like a textured finish. My favourite paper is Canson Montval 300gsm (i.e. 300 grams per square meter). Whatever paper you buy make sure it is heavy weight 300gsm paper. Lighter weight paper will dry with horrible wrinkles you’ll never flat out! Canson Montval paper comes in a 24x32cm size which is perfect for these triptych prints when cut in half lengthways. But it doesn’t have to be watercolour paper… in fact almost any reasonably thick material that is to some extent water absorbent will work (sheet of plywood have worked well for me). A kettle
You can use any method you like to heat the water for the process, but bear in mind you need hot but not boiling water. The precise temperature is not critical, but around 70 degrees centigrade is ideal. I bought this kettle specifically for making emulsion lift prints because it lets you set the temperature of the water. Trays
Trays
For single image emulsion lift prints small 5x7” darkroom trays are perfect. For the 3 image emulsion lift prints I’m describing here one of the trays should be larger… ideally larger than the print you’re making. I repurposed an over dish for the purpose, which wasn’t quite that big, but it works well enough. A drying rack of some kind
I bough a set of these drying racks cheaply from Amazon. They are useful for resting your wet paper on while you’re making the print, and for actually drying the print on when you’re finished. A pipette
A pipette is useful for unfolding folds in the emulsion layer with a squirt of water and also for adding extra water to your watercolour paper while you’re smoothing out the emulsion layer. Brushes
I use a set of brushes I got years ago from Impossible Project specially designed for making emulsion lift prints. This set has 4 brushes: 1 medium sized brush with stiff bristles, a medium sized brush with soft bristles, a large wide brush with extra soft bristles and a fine brush. But any water colour brushes (preferably with a variety of sizes and softnesses) will do.
As already stated, the starting point for my current emulsion lift process is usually a digital image. Both the Impossible Instant Labs and the new Polaroid Lab Instant Printer have their own apps for iOS or Android that allow you to adjust and crop your images, but I prefer to prepare my images in Lightroom (of course you can use your preferred software!) as it gives me more control and, particularly for these triptychs, it lets me pre-visualise the final result.
The focus for this article is making 3 image triptychs (or stitched panoramas), but if you're new to making emulsion lift prints, I would recommend starting off with single image emulsion lifts and then moving on to multi-image emulsion lifts when you're more confident.
This is the finished print I made for this article:
 And this is the straight out of camera image I started with:
 The first thing I did was just process the image pretty much as I would have done for any other purpose. I wanted the rock to be nice and dark against the sky, but still with some detail.
 The next thing I did was crop the image to the right aspect ratio. You might be thinking that Polaroid prints are square and you have three of them next to each other, so an aspect ration of 3:1 should work, right? Actually you want your three square images to overlap slightly, so I use an aspect ration of 2.85:1 instead.
 You can see that I have further darkened the highlights and opened up the shadows using the highlight and shadow sliders in Lightroom. This is because I know from experience that Polaroid film has a fairly limited dynamic range and highlights can blow out easily and shadows will block up even more easily.
I think you’ll agree that the image looks a bit shonky right now, but I know that the shadows in particular will come out much darker in the Polaroid print so in order to retain at least a bit of detail and need to open up the shadows much more than I would for any other purpose.
 I then make 3 virtual copies of my re-imported jpeg image. For the first virtual copy just set the aspect ratio to 1:1 and it will automatically go to the middle.
 For the second virtual copy set the aspect ratio to 1:1 again and move it all the way to the left.
 And for the third virtual copy move it all the way to the left.
 Because I am working with a jpeg image that has been cropped to the correct overall aspect ratio and then re-imported I don’t have to worry the 2nd and third crops drifting about all over the place as I move them. I know everything will line up perfectly.
And here are the three virtual copies side-by-side. You can see that there is a bit of overlap. I then need to export these virtual images as square images and upload them to my mobile phone. 1000 pixels square is plenty big enough as Polaroid prints are quite small.
Video demonstrating the emulsion lift process itself
With that done, we are ready to actually make the emulsion lift print. The video below shows that complete process for making the prints using the Instant Lab, trimming them, separating the layers, and then lifting the emulsion and making the print. It’s about 20 minutes long… enjoy :-)
Variations on the theme
 Vary the amount of folds and wrinkles.
Deliberately use your watercolour brushes to add fold, wrinkles and tears to the emulation layer. It’s almost like painting a photographic image directly onto the watercolour paper! Try creating a completely round image. Create all analogue lifts using a real Polaroid camera
Because with the most recent generations of Polaroid film requires you to separate the layers of the print within an hour or so of making the print, using a real Polaroid camera really only works when creating the Polaroid prints from which you'll be making your emulsion lifts at home. But it can still be a lot of fun! To create this image I picked up some fallen autumn leaves and took them home to shoot on my dining table with an original Polaroid SX-70 SLR camera from 1972. Don’t cut off the entire white border of the Polaroid print
Just cut off the outer 1 or 2mm of the Polaroid print instead. The white border of a Polaroid print is there to cover up the uneven blackish/yellowish border of the emulsion layer. Leaving most of the white border in place before separating the layers of the Polaroid print will leave this blackish/yellowish border on the emulsion lift print, which can be very effective. Create emulsion lifts using Polaroid prints exposed to multiple images
Because the Instant Lab doesn’t automatically eject the print (you have to manually press the eject button) you can easily expose your polaroid print to two or more images. I also left the blackish/yellowish emulsion layer border in place for this print. Use b&w film
Black & white Polaroid film behaves rather differently to colour film: When separating the layers of the print the emulsion layer will stick to the transparent front layer instead of the black plastic back layer, and it will be covered by a layer of white zinc oxide which will lift off in the first couple of seconds after putting the transparent plastic layer in the hot water. I’ve not have much luck with the very latest generation of b&w polaroid film but I hope this isn't permanent change in the behaviour of b&w Polaroid film! In the past I have had very good results from b&w Polaroid film… in fact my Royal Photographic Society Associateship portfolio consisted of b&w emulsion lift prints. Use different numbers and layouts of images.
This examples uses 8 identical images (4 of which were reversed before making the Polaroid prints) rotated to create an abstract pattern. See more in the Abstract spomenics gallery.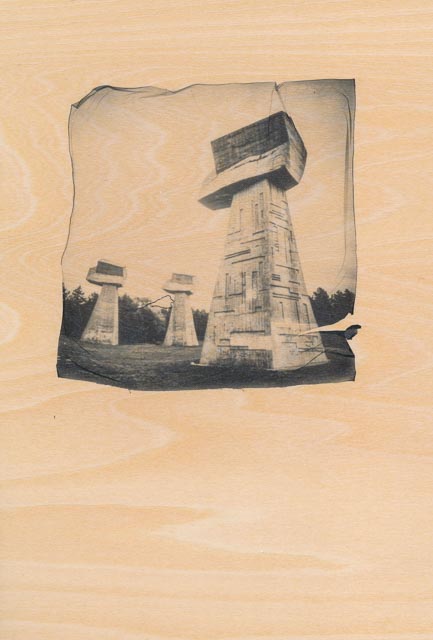 Try different receiving materials.
Anything that has a degree of water absorbency should work. For example I have found sheets of plywood very effective. See the Wooden spomenics gallery for more. Try digital images that aren’t even photographs.
Any digital image will work… it doesn’t even have to be a photograph! Try creating abstract designs or designs using lettering and fonts in Photoshop. The example shown here was originally designed to be the from cover of a small hand bound book of emulsion lift prints of the 'Magnificent 7' cemeteries in London.