Digital pinhole photography with a home made pinhole lens

When you put a tiny pinhole in front of a sensor (either a digital sensor of film) it will invert and focus an image on your sensor just like a glass lens would. Because the hole is so small it will give almost infinite depth-of-field, meaning you don’t need to worry about focusing. Also because the aperture is so small refraction will mean the image is never as sharp and that produced by a proper glass lens (and using this technique described here will give even softer images). But these two factors together give pinhole images a very unique character.
Digital pinhole photography is a great way to get dip your toe in the world of pinhole photography as you will be able to see your results pretty immediately and adjust your experimental techniques accordingly.
Ingredients & tools

-
A lens adapter.
An adapter to mount M42 screw mount lenses on your mirrorless camera will be cheapest. You can find M42 adapters on eBay for less than £5 if you don't mind buying direct from the Far East. Note that if you do buy direct from China you'll have to wait a couple of months to get your adapter, so plan ahead! If you want an adapter from a U.K. supplier expect to pay more… the least I've paid for an unbranded adapter from an U.K. supplier is £13.
-
Black electrical tape.
You probably have this laying around at home, but if not you can find electrical tape on Amazon for around £2.50.
-
A pin or sewing needle.
Again you probably have this lying around, but if not find sewing needles on Amazon for around £2.
- A pair of scissors.
Assuming you have basic things like electrical tape, sewing needles and scissors lying around the house, you can get going with a budget around £5, but even if you don't you shouldn’t have to spend much more than £10.
Method
Begin by simply covering the lens end of your adapter with electrical tape. Then use a needle or pin to make a pinhole as close to the centre of you lens as possible (but if its a little bit off it won’t matter too much!)
 |
 |
 |
 |
 |
|
 |
 |
Then simply mount your home made lens on your camera and shoot! (See General notes on using adapted lenses if your camera tells you that you have no lens attached.)
Using the above construction method your lens will have an effective focal length of around 40mm. Many mass produced digital pinhole lenses have much shorter focal lengths for an ultra wide-angle effect, which can be a lot of fun. But I prefer the effect that a focal length nearer to a standard lens gives. I leave my camera in 'P' mode and ISO set to auto and let my camera worry about exposure.
Disadvantages:
- The pinhole you get using this technique will not be perfectly round. This means that you results will be much softer than you would get with a commercially manufactured pinhole lens. The size of the pinhole will play a part here: a hole made with a finer needle will give sharper results but will let through less light and give longer shutter speeds. If you make your pinhole with a thicker needs you wil get a larger hole with shorter stutter speeds, but your results will be even fuzzier. For me this isn't really much of a disadvantage because I actually like the softer but more painterly results I get using this technique.
- The material with which you are making your pinhole is not very stable. I have found that the pinhole will start to close uo in as little as half an hour. This is fairly easy to deal with though: just take the needle with you wherever you go with your pinhole lens so you can re-make the pinhole as needed (I use a 35mm film canister to contain the needle safely in my pocket).
Advantages:
- It’s cheap! I already had all the ingredients so for me it was essentially free. And even if you don’t have a lens adapter lying around they can be had for less than £5 on eBay if your prepared to order directly from the Far East and wait a couple of months for it to arrive. So this technique is a great way to dip your toe in the world of pinhole photography without a big outlay.
- It’s quick and easy: you can build your lens in 10 minutes using tools without any specialist tools. All the tools you need are probably already lying arund your home.
- You adapter won’t be damaged. You can rip off the electrical tape at any time you want to use your adapter for its normal purpose.
- It's very versatile and creative. For me this is what makes this method of making a pinhole lens so great. Use different sizes of needle to create holes of different sizes. And you don’t have to stick to one pinhole. Try 2, 5 or 10 pinholes! And you can make, re-make your lens multiple times to try out different sizes and patterns of pinholes. (One role of electrical tape is enough to re-make your lens 100s of times.)
Examples
These images were all taken using a single pinhole lens. The black and white conversions were done in Silver Efex Pro.


This is what can happen when the pinhole in the unstable electrical tape starts to close up, but this kind of experimental photography is all about embracing imperfections!

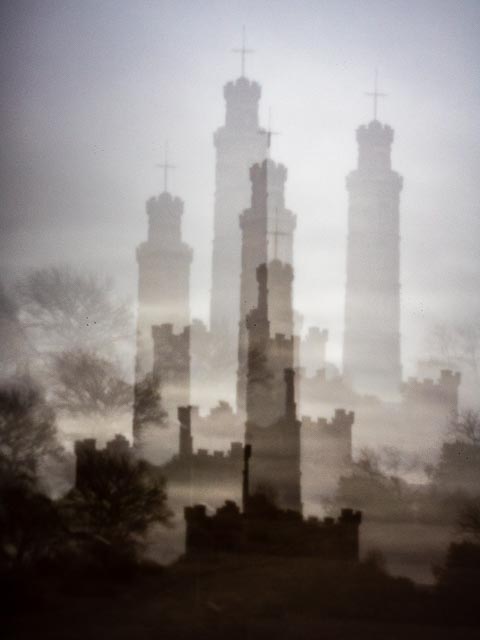
These images were all created with a lens that had 5 pinholes all grouped fairly close together in the centre of the lens. You can see the pattern of pinholes clearly in most of these images. All these images have been treated with a set of curves in Lightroom to try and simulate the effect of cross processing.


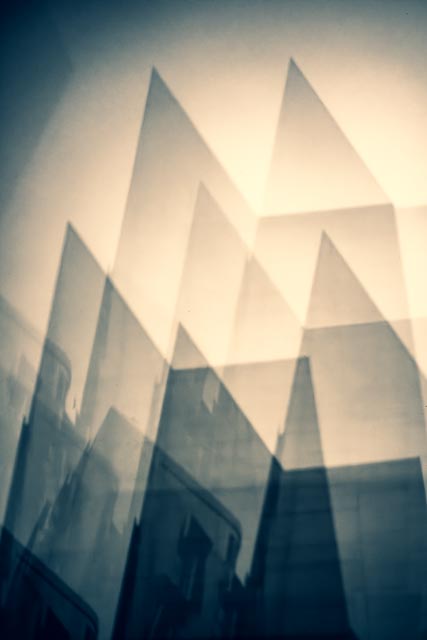
These images were all created with a lens that had 6 pinholes. The subject is the Scottish Parliament Building in Edinburgh. All these images have been treated with a set of curves in Lightroom to try and simulate the effect of cross processing, but this time adjusted to give brighter colours.


These images were all created using a lens with nine pinholes: one in the centre, and a ring of 8 near the edge of the lens. I thought this would give me a clear central image surrounded by a ring of images at edge of the frame. But they show how difficult it is to predict how images from multi-pinhole lenses will turn out! Most of the holes at the edge of the lens threw an image that didn't land on the sensor at all, meaning only 2 or 3 strong (and and a couple of faint) images have been recorded. But this unpredictability is all part of the fun! My advice is to use the fact that you can easily build, re-build and re-build again your lens to try lots of different hole patterns.
The first 3 images use Adobe Lightroom's 'Modern 04' colour profile, and the fourth uses the 'Modern 01' profile.