Kodak DC260 Zoom


Introduction
| Announced | May 1998 |
|---|---|
| Camera type | Compact digicam |
| Camera size | 550 grams 118 x 56 x 108 mm (inc. battery) |
| Sensor type | CCD |
| Sensor size | 1/2" (7.2 x 4.8 mm) |
| Resolution | 1536 x 1024 (1.57 megapixel) |
| Memory card | Compact Flash (maximum size 32mb) |
| Battery | AA x 4 |
| Lens | Kodak Ektanar F3.0-4.7 38-115mm (full-frame equiv.) |
If you just want to see some photographs, skip straight to the results section.
It's often assumed that Kodak failed at the digital photography game because they were late to the party, but actually Kodak were there pretty much from the very beginning of digital photography, and some of their earliest products were pretty cutting edge at the time. And here is one example, the Kodak DC260 Zoom launched last century, in May 1998 to be precise.
Back in 1998 this was the joint highest resolution consumer level digital camera you could buy (it shared the 1998 resolution gold medal with the Canon PowerShot Pro70). But the Kodak had a feature the Canon lacked; it ran an operating system called DigitaOS that was specifically designed to allow it to run both your own home-brewed scripts, and commercial 3rd party applications downloaded from the internet. Let's just digest that for a moment… that's right… a full decade before Apple launched the iPhone 3GS with access to an app store, and Google launched the Android Market app store (later rebranded as the Google Play app store), here was a mobile multi-media device (well, it had a wee speaker that could, just about, play more than just the occasional beep or boop) that could run commercial quality 3rd party applications!
But DigitaOS was just too far ahead of it's time to really find a place in the digital camera market of the late 1990s. In the couple of years following DigitaOS's launch in 1997, a small number other DigitalOS cameras were launched by Kodak, Minolta and Hewlett-Packard/Pentax (including the Minolta DiMÂGE EX and the Photosmart C912/Pentax EI-2000), but by 2000 interest had wained and DigitaOS quietly disappeared. But DigitaOS was built from the outset to run 3rd party apps, it's lack of a crucial app store to allow apps to be easily marketed and distributed prevented it from starting a true iPhone/Android style revolution.
But that doesn't mean there wasn't a healthy and enthusiastic developer community. So in the absence of commercial applications, there are quite a few community applications, even though some of them certainly weren't really intended to run on a digicam with a 2 inch monitor! One such example is a port of Doom (yes… that Doom…!). See the Running Doom on the Kodak DC260 Zoom section at the end of this article for more info.
Buying a Kodak DC260 Zoom in 2025
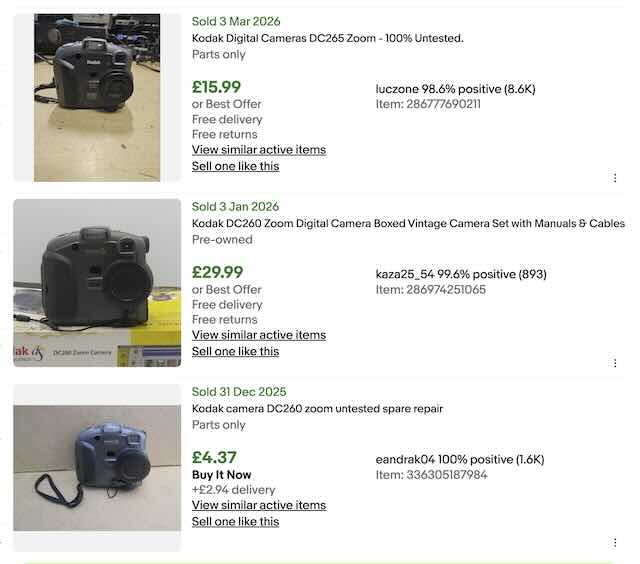 Any digital camera as old as this one is going to be a least a little on the rare side in working condition, and the Kodak DC260 is no exception. But at any one time you'll probably find one or two in your country, and saved searches on eBay are a great way to get notified when new examples are listed. But demand for these things is also quite low, so if you want to experiment with a seriously old digicam, you shouldn't have to completely destroy your credit rating to do so! As the as the eBay search for sold listings in the UK (carried out o20 March 2026) shown here illustrates, expect to pay around £15-30 for one in good usable condition. In fact towards the top end of that range you should be expecting very good condition.
Because this camera takes standard AA batteries you're unlikely to find batteries and charger included, but (particularly if you develop a habit for playing Doom on your DC260!) you might want to look out for the AC power supply. I paid £16.49 (inc p&p) for mine in December 2025. It's in good (but not great) working condition, and fully working order, but came without any accessories.
Kodak DC260 Zoom body tour
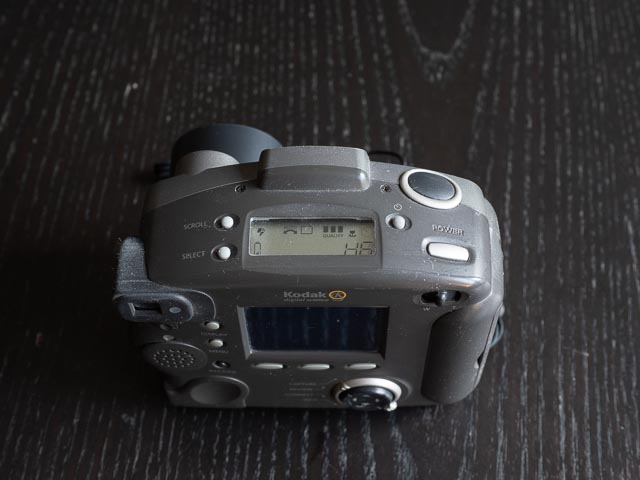 The Kodak DC260 has a slightly unusual taller-than-it-is-wide body, though this style of body seems to have been quite popular back in the late 1990s (see my last article about the Konica Q-Mini for another camera from this era with a similar body shape). Starting on the top of the camera you'll find the power and shutter buttons together with a fairly large status LCD screen. Like many early digicams, you rarely have to dive into menus for day-to-day photographic functions, so you use this LCD panel to set most of your settings using the buttons labelled "scroll" and "select". The scroll button cycles through four functions, and the select button cycles through the options for the currently selected function. The four functions are: Flash mode (Auto, Red-eye, Fill or Off), Exposure compensation (from -2 stops to +2 stops in half stop steps), Picture Type (Still, Burst and Timelapse), and Quality (Good, Better and Best). Finally there is a dedicated button to activate a 10 second self-timer.
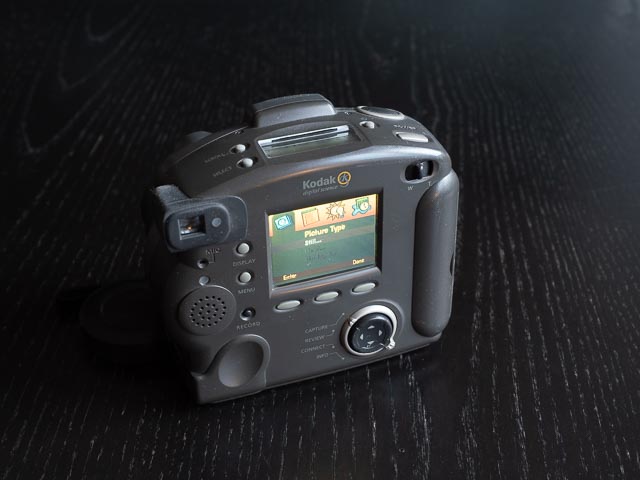
 On the back of the camera, in the top right hand corner you'll find a rocker switch to control the zoom lens, and on the top right you'll find the viewfinder with an indicator light to tell you if focus has been successfully acquired. The monitor takes pride of place between the two.
To the left of the monitor you'll find the "display" button to enter live-view mode while in capture mode (but by default the camera expects you to use the viewfinder as using the LCD monitor will drain your batteries pretty quick) and a "menu" button. Under that is a button marked "record", but don't be fooled into thinking this is the worlds earliest digicam capable to shooting video! It actually let's you attach brief sound clips to photos. And under the monitor are three unlabelled soft buttons, the function of which is indicated on the monitor above (all DigitaOS cameras have these). At the bottom of the camera there is a four-way controller for navigating around the menus, surrounded by a mode dial for switching the camera between "capture" mode for taking photographs, "review" mode for viewing previously captured photos on the monitor (like all early digicams you have discrete shooting and review modes, so no half-pressing the shutter button to instantly return to shooting mode!), connect mode for connecting your camera to a computer or other devices via RS232, USB or infrared for wireless connections, and an "info" mode, which just displays some very basic information about the camera, like the firmware version, some copyright information, and a URL for the DC260 page on the Kodak website. And yeah, I tried it and not to surprising it no longer works. Whether a whole operating mode was really necessary for such a simple thing is up for debate! (Actually I take it back… it really isn't!). Under the viewfinder you'll find the mic for recording those all important sound clips and tiny speaker for playing them back (or, of course, getting sound effects when playing Doom!).
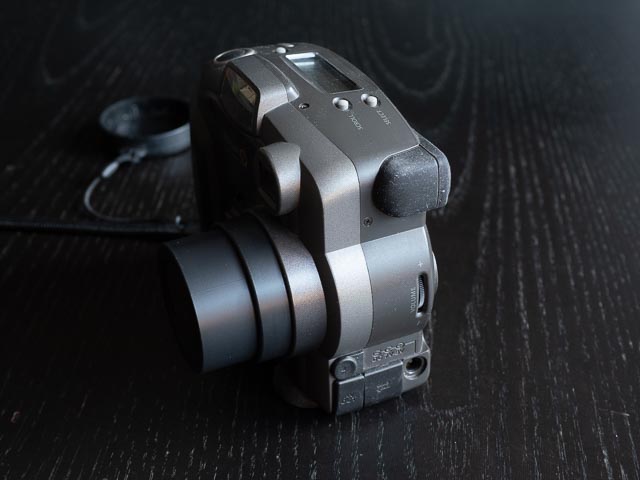 On the left hand side of the camera (as you're using it) you find the a volume wheel for setting the volume of the previously mention speaker (it goes from quiet to slightly less quiet) and a selection of ports (you get an PC port for connecting an external flash unit, and video/auto out port for connecting to a TV, a serial port for using an RS232 or special USB cable, both of which were optional accessories) and finally a port for the AC adapter (also an optional accessory).
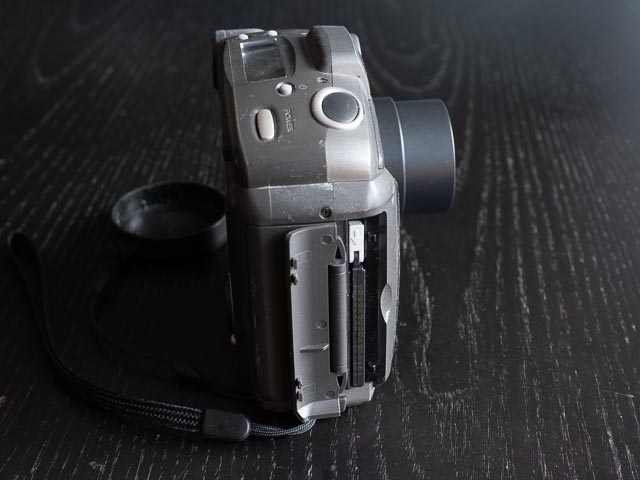
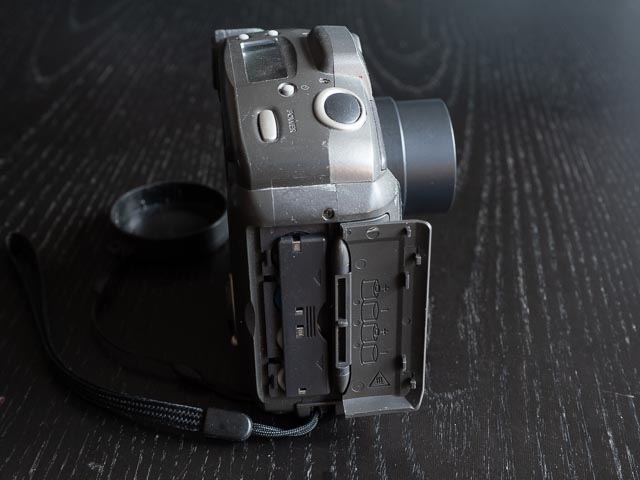 On the right hand side of the camera you'll find the separate battery and memory card compartments.
The front of the camera doesn't have any controls, but you will find the built-in flash, lens (natch!), and windows for the infrared transceiver, auto focus sensor and light meter, plus a light to indicate the self-timer is running. Finally, on the bottom you'll find a trip bush.
Using a Kodak DC260 Zoom in 2025
The first impression I got on picking up this camera is that it's a bit… well… cheap and plasticky to be honest. It's really not badly built, and the mere fact that this thing is still working nearly 3 decades later counts for something, right? But the buttons, dials and levers feel distinctly mushy. Essentially this is an easy to use automatic camera, so you don't have to interact with buttons for most things, except perhaps the particularly squishy zoom lever.
Of course you have the fun of dealing with all the usual foibles of a camera this old: it's really slow (start up time is around 10 seconds, and shot-to-shot times are at least 5 seconds), and when using the rear monitor for live-view you get quite a desaturated and low-contrast version of the scene in front of you with plenty of tearing as you move the camera around. Of course the camera assumes you'll be using the tunnel type optical viewfinder by default, and given how quickly live-view depletes the battery that's probably what you'll want to do. That optical viewfinder zooms when you zoom the lens, but the frame lines only cover about 80% of the real field of view, but that's necessary given its lack of accuracy. And on my model the LCD status planel on the top of the camera is pretty faded and difficult to see, but I assume that's mainly because of this camera's age.
But that really is all just part of the fun of a stroll down memory lane with a vintage digital camera! And I really did have a lot of fun with this camera. Also, I really do think that sometimes putting some really tight contraints on your photography with a camera like this is actually a great way to exercise your creativity. If you can get some good shots using a clapped out bit of old junk like this, then you know for sure that equipment is less important than your creativity!
Kodak DC260 Zoom results
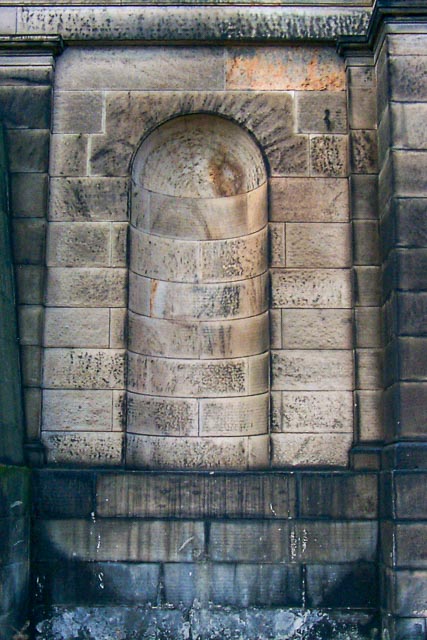
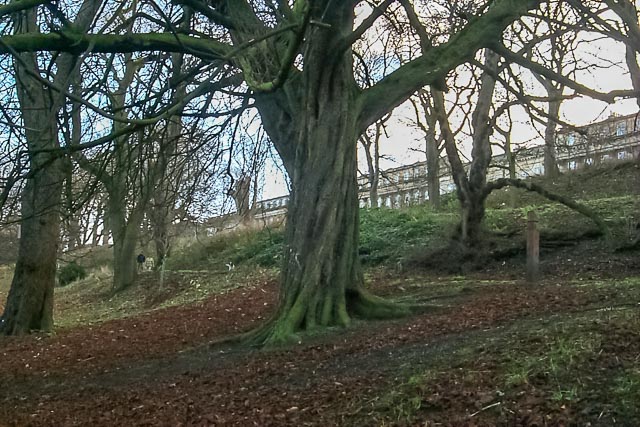
 Just like with the handling, you can expect all the usual vintage digicam foibles with the results too. So you can expect plenty of blown highlights and black shadows. But I think there something very attractive with the way the blown highlights in the winter sky shots below roll of into the darker areas. This camera handles that sort of thing better than some far more modern cameras I've used recently! And I found the colours somewhat desaturated, but still very attractive.
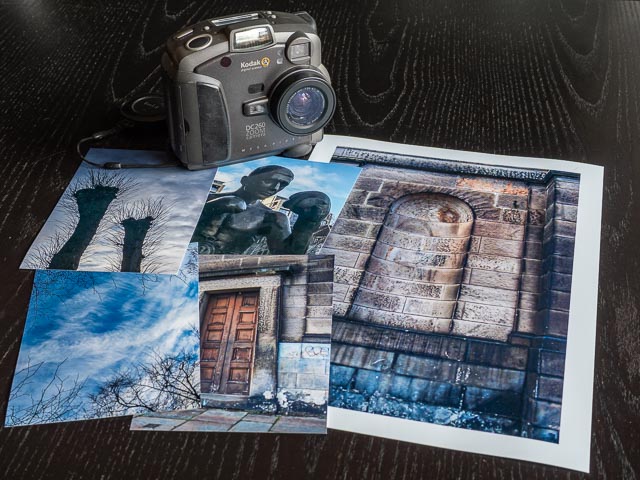
And I can confirm that this camera passes the minimum test for a photographically useful camera by producing some very nice 150 x 100 mm prints. In fact the A4 print I made from one of this camera's images (with 1.5cm borders, so slightly smaller than A4) also looked very nice indeed. Not at all bad for a 1.5mp camera from nearly 3 decades ago!
The DSLR style 3:2 aspect ratio of the images generated byt the DC260 may reduce the resolution of the images you print if you prefer to make standard 8 x 10", but if you prefer modern 150 x 100mm or A4 print sizes then these image files will fit with little to no cropping.
You can expect plenty of noise unless the camera gets the exposure spot on, but I found Lightroom did a good job of dealing with that. All the images below have been adjusted to taste in Lightroom, including noise reduction. One thing to note though: this camera doesn't provide any EXIF data, so your guess is as good as mine when it comes to the settings for these photos.


Conclusion
I have to admit I didn't particularly enjoy the mushy controls and slightly plasticky build quality of the DC260. But the results really were surprising lovely with beautiful, natural colours. A4 sized prints are a real possibility with this camera.
P.S. Running Doom on the Kodak DC260 Zoom
So yeah… as described in the introduction, when you're done taking photographs for the day, why not relax with a little bit of Doom?! Getting Doom to tun is surprisingly simple. There's no complicated hackery involved as running 3rd party apps is something DigitaOS was specifically designed to do. Here are the steps involved:
- Download the relevant .ZIP file for the Kodak DC260 from the page for the DigitaOS Doom port on the WaybackMachine archive.
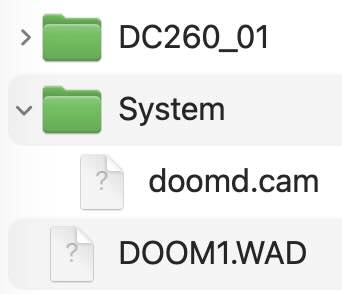 Unzip the file and copy the "SYSTEM" directory and "DOOM1.WAD" file to the root folder of the CF card you're going to use in your DC260 using a CF card reader (it needs at least 5mb of free space to hold these files). The file structure should look something like that illustrated here. If you've already used this card to shoot any photos, the "DC260_01" folder will have been automatically created by your camera to hold your photos.
- Put this compact flash card in your camera.
- Set the mode dial on the back of the camera to "review".
- Power on the camera.
- Hit the menu button.
- If you got the file structure on the CF card right, you'll see a new floppy disk icon. Navigate to this icon, then navigate to "doomd.com" item (if you've only got one app on your CF card it'll be highlighted by default) and hit the "start" key.
- Finally a quick press of the power button will boot the camera into Doom.
Patience is required as the boot up process takes 10-15 seconds! You can see this all working in this video. You'll find a file called READMEDOOMD001.txt file in the .zip file you downloaded telling you what keys on your camera do what when playing Doom. Have fun!
Finally, I recommend a video called DOOM on a Digital Camera from 1998! from the LGR Youtube channel for some interesting background information on the inner workings of the DC260.